Unlocking the Power of Angular Jasmine Unit Tests
Guidance on writing frontend unit tests using Jasmine framework and Karma
INTRODUCTION
In the world of web development, ensuring the reliability and functionality of our applications is key. Just as a solid foundation supports a building, Angular Jasmine unit tests provide critical support in web development.

Understanding the Testing Pyramid: The Base Matters Most
Imagine testing as a pyramid divided into three levels. At the base, we have unit tests. In the middle, integration and API tests sit, and at the top, end-to-end (E2E) tests take the smallest share, and manual tests share will greatly vary depending on the business needs.
Surprisingly, unit tests make up a whopping 70% of the pyramid’s foundation. Unit tests act as the gatekeepers of our applications, carefully examining every component to ensure everything works as expected. They form the essential foundation, preventing errors and instability.
Going Beyond the Surface: What Unit Testing Truly Means
Unit tests go beyond the surface-level interactions. They dive deep into our codebase, analyzing logic, calculations, and data handling. Unit tests are versatile; they aren’t limited to user interfaces. They can validate any part of your application, from complex calculations to data management tasks.
The 70% Rule: Prioritizing Unit Tests
In software testing, there’s a rule: allocate 70% of your testing effort to unit tests. This reflects their foundational role. While integration, API, E2E, and manual tests are crucial, unit tests are where it all begins.
By focusing on thorough unit testing, we establish a robust defense for our applications. This ensures they remain dependable and deliver as intended. In this article, we’ll explore Angular Jasmine unit tests.
Whether you’re new to testing or looking to enhance your skills, this article will provide valuable insights into Angular’s unit testing world. Together, we’ll uncover the significance and intricacies of Angular Jasmine unit tests.
JASMINE AND KARMA
Jasmine is a popular testing framework commonly used for writing unit tests in Angular applications.
Karma is a test runner that works with Jasmine and other testing frameworks to execute tests in different browsers and environments. It allows you to configure which browsers to use, how to run the tests, and how to report the results.
Jasmine provides a syntax for writing tests, which includes functions like describe, it, expect, and others. Describe is used to group tests together, it is used to define individual test cases, and expect is used to make assertions about the behavior of the code being tested.
SETUP AND RUN
Jasmine is included as a default dependency in Angular and is already installed when you create a new project using Angular CLI, so you do not need to install Jasmine separately if you are using Angular CLI to create a new Angular project or generate new components, services, or other features.
All you need to do is create a .spec.ts file for your component, service, or other feature, and write your test cases using Jasmine functions and helpers.
You can see the configuration inside the configuration file for Karma (karma.conf.js) and see what files are currently included in the test suite, the browsers that are going to be used, and other options:
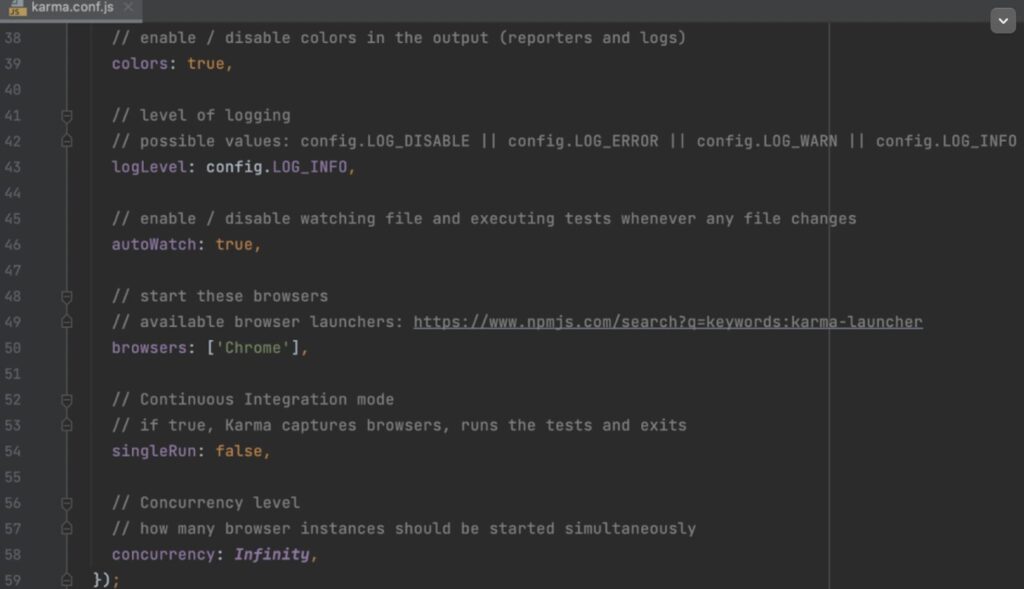
You can run the tests using the karma command: ng test
This will start Karma and run the tests in the configured browsers. You can then view the results in the console or in the browser.
WRITING UNIT TESTS
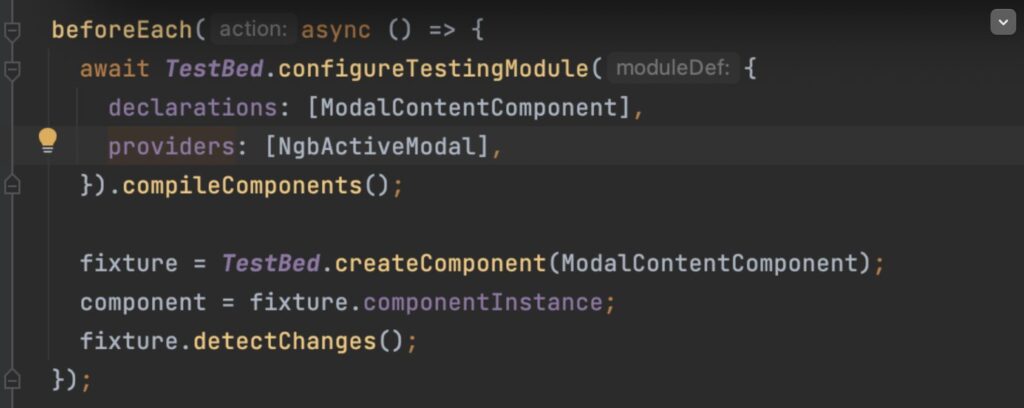
Test setup
Here is a brief explanation of the test setup in Jasmine:
- TestBed: TestBed is the core of Angular’s testing infrastructure. It provides methods for configuring and creating a testing module, which is a collection of components, services, directives, and pipes that are required for testing a particular component.
- ConfigureTestingModule: The configureTestingModule method is used to configure a testing module by providing a list of components, directives, pipes, and services that are required for testing the component. When calling configureTestingModule(), we pass an object that has three properties: declarations, providers, and imports.
- Declarations: An array of components, directives, and pipes that we need to declare and compile in our test module. This is similar to what we would do in a regular Angular module.
- Providers: An array of services and other providers that we need to provide in our test module. This is where we can provide any mocked or stubbed services that our component relies on.
- Imports: An array of other modules that we need to import in our test module. This is where we can import any modules that our component relies on, such as HttpClientTestingModule for testing HTTP requests.
- CompileComponents: After configuring the testing module, the component must be compiled so that it can be tested. The TestBed.createComponent() method is used to compile the component.
- ComponentInstance: The component instance is obtained by calling the fixture.componentInstance method. This provides access to the instance of the component that is being tested.
- DetectChanges: After creating the component instance, changes are detected by calling the fixture.detectChanges() method. This is necessary because Angular’s change detection system does not run automatically in the testing environment.
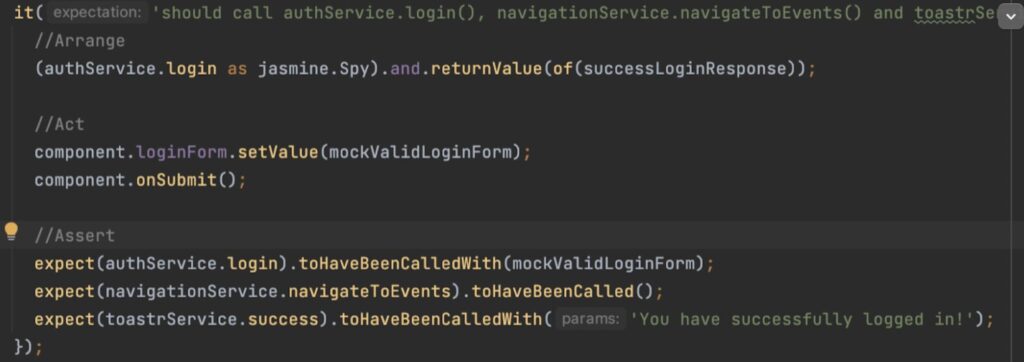
Naming -> Use “should-when-then” pattern for naming unit tests
Using this naming pattern helps to create more clear, focused, and maintainable unit tests by making it easy to understand what the test is checking and what the expected behavior should be.
The “should” part of the name specifies the expected behavior or outcome of the code being tested. This is typically written positively, such as “should return X” or “should display Y”.
The “when” part of the name describes the action or event that triggers the code being tested. This is often written as a setup step, such as “when input is A” or “when the function is called with B”.
The “then” part of the name specifies the actual test or assertion being made, which checks if the expected behavior or outcome matches the actual behavior or outcome of the code being tested.
AAA pattern -> Use Arrange, Act, Assert pattern when writing unit tests (AAA pattern)
Widely used approach for structuring unit tests. The idea behind this pattern is to make the tests easy to read and understand by separating the test into three distinct sections: arrange, act, and assert.
Arrange: In the “arrange” section, you set up the test by creating any necessary objects and initializing any variables that will be used in the test. This is where you create your test fixtures and prepare your system under test for the test to be performed.
Act: In the “act” section, you perform the action or behavior that you want to test. This could be calling a function, interacting with a UI element, or any other action that your system under test is designed to perform.
Assert: In the “assert” section, you check the results of the action or behavior you performed in the “act” section. This is where you compare the actual results of the action with the expected results, and determine whether the test has passed or failed.
Locating Elements in the HTML
When writing Jasmine unit tests for Angular components, it’s common to locate and interact with elements using CSS selectors. CSS selectors allow you to precisely target elements based on various criteria like element type, class, ID, and more.
In Angular tests, you can use the fixture.debugElement.nativeElement.querySelector() method along with CSS selectors to find specific elements in your component’s HTML template. Here are some examples:
- By Element Type: To select elements by their HTML tag name, you can use the element type as the CSS selector. For instance, to find a div element:
const el = fixture.debugElement.nativeElement.querySelector('div');
- By Class: To locate elements with a specific class, you can use the class name preceded by a dot (.) as the CSS selector. For example, to find an element with the class “my-class”:
const el = fixture.debugElement.nativeElement.querySelector('.my-class');
- By ID: To target an element with a particular ID, use the ID name preceded by a hash (#) as the CSS selector. For example, to find an element with the ID “myElement”:
const el = fixture.debugElement.nativeElement.querySelector('#myElement');
- By Attribute: You can also search for elements with specific attributes using square brackets. For example, to find an input element with the attribute name=”username”:
const el = fixture.debugElement.nativeElement.querySelector('input[name="username"]') - Combining Selectors: CSS selectors can be combined to create more complex queries. For instance, to find a div element with the class “my-class” inside a container with the ID “container”:
const el = fixture.debugElement.nativeElement.querySelector('#container .my-class');
By leveraging CSS selectors in Jasmine tests, you can easily target and test elements within your Angular component’s HTML template based on various criteria, making your tests more precise and effective.
Built-in matchers in Jasmine
Matchers in Jasmine are used to write assertions in test cases. They allow us to compare the actual results of a test with the expected results.
Here are some commonly used built-in matchers in Jasmine:
- expect(x).toBe(y) expect(x).toEqual(y)
- expect(x).toBeDefined() expect(x).toContain(y)
- expect(x).toBeTruthy()– checks that x is truthy (not false, null, undefined, 0, NaN or an empty string)
- expect(x).toBeTrue()– check if value of the x is exactly equal to true
- expect(x).toBeFalsy() expect(x).toBeFalse()
- expect(x).toBeLessThan(y) expect(x).toBeGreaterThan(y)
- expect(x).toBeCloseTo(y, numDigits)
We can also chain multiple matchers together using the not keyword to invert the result, or using the expect(…).not.to…() syntax. Additionally, they can create custom matchers using the jasmine.addMatchers() method. All built-in matchers you can check on official site.
Spies
In unit testing, it’s important to isolate the code under test and only test its functionality without dependencies. This is where mocking services and spies come in handy.
A spy is a feature provided by Jasmine that allows you to track function calls and arguments.
To mock a service, you create a fake version of it that returns predetermined results or behaves in a specific way. Jasmine spies are used to track calls to functions and their arguments. You can create a spy on a function using jasmine.createSpy().
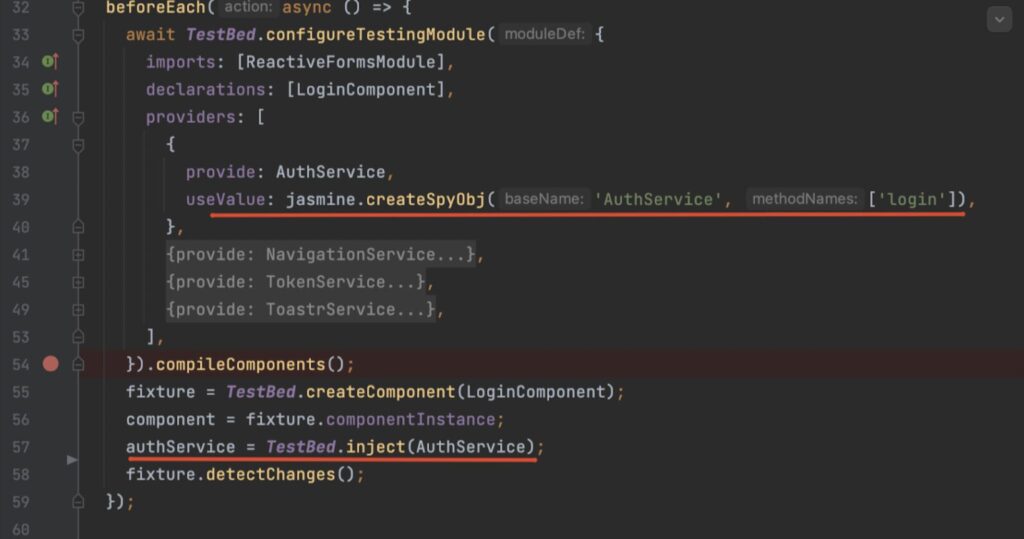
In providers provide mocked AuthService service that has a login method. We create this mock service using the jasmine.createSpyObj method, which creates a spy object with a given set of methods that can be used for testing.
Then we injected the AuthService service using TestBed.inject, which creates an instance of the AuthService that we can use in our tests.
Inside test – We then set up a spy on the login method of the AuthService using (authService.login as jasmine.Spy).and.returnValue(of(successLoginResponse)).

This means that whenever the login method is called, it will return an observable (this of makes sure the observable is returned) that emits a successLoginResponse value. This allows us to test the behavior of the component when the login method succeeds.
Parameterized tests
Use parameterized tests whenever tests are verifying the same functionality in order to not have duplicated code.
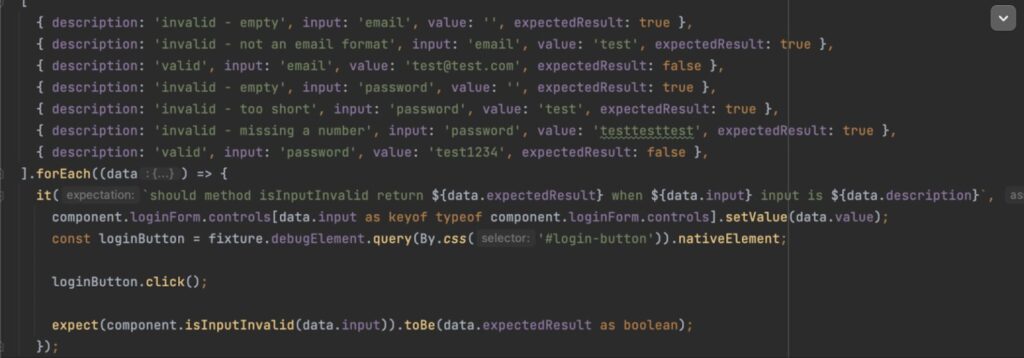
Disabled and focused test
You can disable tests without commenting on them by just prepending x to describe or it functions. In example on the image, this test will not be run.

You can also focus on specific tests by pre-pending with f, like so:

Out of all the tests in all the test suites and test specs, these are the only ones that will be run.
Debugging
Start tests with the command ng test and click on the test you want to debug on the browser.
Open inspect elements and find spec test files in the source section. Add a breakpoint and reload the page.
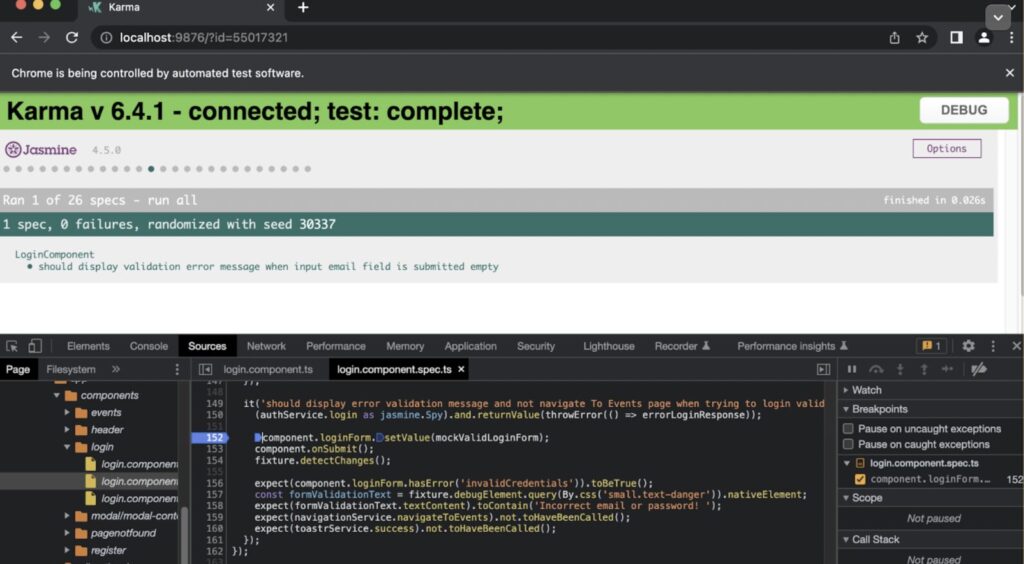
The test will pause on the added breakpoint and now you can evaluate the value of each code line.
CONCLUSION
In conclusion, Angular Jasmine unit tests are the backbone of reliable software development. They provide an essential foundation. With unit tests, we can catch issues early in the development process, ensuring that our code performs flawlessly. We’ve explored various aspects of unit testing, from the basics to more advanced techniques, including naming conventions, spies, assertions, and debugging. By incorporating these practices, we fortify our codebase against potential bugs and glitches, ensuring that our applications deliver a seamless user experience.


